In the previous post, DungeonTavern: Customer States and Behavior, each customer already had a seat by the time they finished ordering. They still had to walk over to it.
There might be several tables between the starting point and the destination. How does the game find a route around them?
The NPCs in the DungeonTavern demo use Unity’s navigation system.
To explain its A* algorithm, I’ll simplify the tavern into a grid map and start with breadth-first search.
# Representing the map
Suppose a customer is standing at B3 and wants to reach H3. They can move one square up, down, left or right. Furniture blocks a square entirely.
I’ve also marked three crowded squares, D3, E3 and F3. We’ll use them to compare algorithms later. The game itself doesn’t assign an extra cost to this stretch of floor.
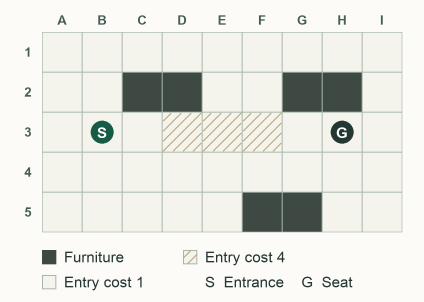
Each square the customer can stand on is a node. Two squares are connected if the customer can step directly from one to the other.
If every step costs 1, walking right from B3 to H3 takes just six steps, the fewest possible. Now change one rule: entering an ordinary square costs 1, but entering a crowded one costs 4. The direct route still takes six steps, but its cost rises to 15. Taking two extra steps via the next row could work out cheaper.
How can we apply that example to an actual game scene?
Unity’s navigation mesh uses a similar way to divide up the map.
We split the walkable floor into convex polygons and allow movement between connected neighbors. Each polygon serves a role similar to a square in the diagram.
Polygons vary in size, and so does the distance traveled through them, so distance needs to contribute to the cost. Unity places search nodes on the polygons and calculates the cost between them as distance multiplied by the cost of the area being traversed.
This gives us a graph representation of the navigation mesh. Each polygon corresponds to a search node, an edge connects nodes the character can move between, and its weight records the cost of that move.
# Pathfinding algorithms
To make the search process easier to see, I’ll use the same grid map to explain these algorithms.
First, BFS finds the route with the fewest steps. Dijkstra then accounts for steps with different costs. Finally, A* uses the destination’s position to help decide which direction to explore first.
# BFS and the fewest steps
Breadth-first search (BFS) spreads outward from the start in layers of steps. It checks positions reachable in one step before those requiring two, then three, and so on. The first route it finds therefore uses the fewest steps.
When every step costs the same, the fewest steps also give the lowest cost. A first-in, first-out queue gives us this search order.
Put B3 in the queue. Take it out and check its neighbors in the order right, down, left, up. C3, B4, A3 and B2 are all new, so add them to the back of the queue and record B3 as the square each came from.
Next, take out C3. Its newly discovered neighbors, D3 and C4, also go at the back. The remaining one-step neighbors will therefore get their turn first.
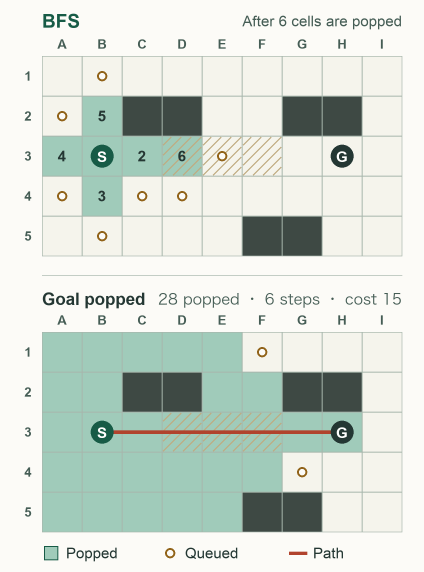
The first time BFS discovers a square, it has found a route to it with the fewest steps. If another neighbor finds the same square later, it can skip it.
Keeping just that first predecessor for each square is enough. From H3, follow the predecessors back to the entrance and reverse the sequence to recover the route.
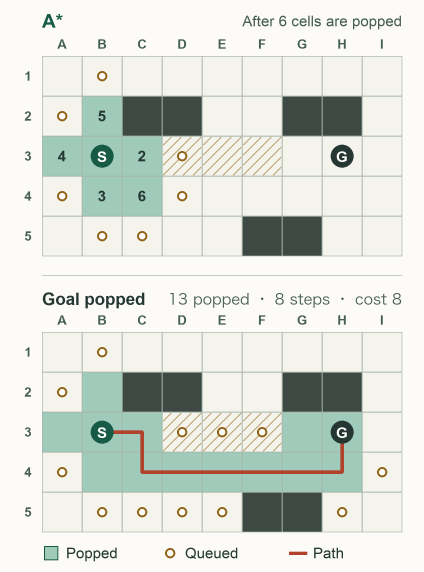
All three searches in the figures stop when the destination is taken from the queue. The count includes both the start and the goal. BFS takes out 28 squares and returns the straight route from B3 to H3.
That’s a perfectly good answer if we’re counting steps. It also passes through all three crowded squares. To give the customer a reason to go around them, we need to count the cost of each move.
# Dijkstra and path cost
When steps have different costs, Dijkstra adds up the cost of reaching each position and checks the cheapest one first. This gives a cheap detour a chance to be found before an expensive shortcut.
To do that, it records a value g for each discovered square: the lowest cost found so far from the start to this square. Squares waiting to be checked go into a priority queue, and the one with the smallest g comes out first. In these figures, ties go to the square added first.
Take C3. It costs 1 to get there from B3. Moving right into the crowded square D3 brings the total to 5, while moving down into C4 brings it to just 2.
Even though we see D3 first, C4 gets priority. For each neighbor, compare its recorded cost with the cost of reaching the current square plus the cost of stepping into that neighbor. If the new route is cheaper, update both the cost and the predecessor. Unlike BFS, we can’t commit to a route as soon as we discover the square.
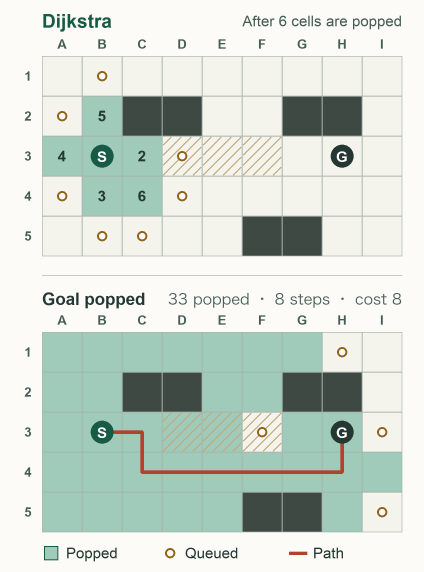
With nonnegative edge costs, once the cheapest square comes out of the queue, no unexplored route can lower its cost any further. That’s why we wait until the destination comes out of the queue before accepting its cost.
This time the customer turns from C3 to C4, walks along row 4 to H4, then heads up to H3. All eight steps cost 1 each, much cheaper than the direct route’s 15.
Dijkstra takes out 33 squares on this map. That includes cheap squares to the left, even though they lead away from the seat. Since we know the seat is to the right, could we give the squares closer to it an earlier turn?
# A* and estimating the cost to go
Along with the cost so far, A* considers how far a candidate position is from the goal. It prioritizes directions with a lower estimated total cost. This estimate of the remaining cost is called a heuristic.
It keeps Dijkstra’s cost so far, g , and adds h , an estimate of how much it will cost to reach the goal from here. The next square out of the priority queue has the smallest f = g + h .
Recording the route and updating the predecessor when a cheaper one turns up work the same way as in Dijkstra.
We can move in four directions, and the cheapest step costs 1. Ignoring furniture and crowds for a moment, add the horizontal and vertical distances in squares to estimate h . This is the Manhattan distance.
From C3 to H3 we still need to move at least five squares horizontally, so h = 5 . From B4 we need at least six horizontal moves and one vertical move, so h = 7 . Both squares cost 1 to reach from the start. A* therefore picks C3, with f = 6 , first. From C3, the expensive square D3 gets g = 5, h = 4, f = 9 . C4 on the detour gets g = 2, h = 6, f = 8 , so the detour now takes priority.
The estimate can be low. A table might force us to take extra steps, but the distance measured without obstacles is still a lower bound. On this grid, h changes by at most 1 between neighbors, and a step costs at least 1. Consequently, f can’t decrease along a route. With this estimate we still get the minimum cost when the goal leaves the queue.
Set every h to zero and the queue orders squares by g alone: we’re back to Dijkstra. Overestimate the remaining cost, on the other hand, and a cheap detour might stay at the back of the queue until after a more expensive route reaches the goal.
Here A* finds the same route costing 8 as Dijkstra, but it takes out only 13 squares. The order used to break ties can change that count and sometimes the choice between equally good routes. What’s particularly clear in the two figures is the direction in which each search spreads.
# Unity’s navigation mesh
Back in the tavern, Unity bakes a navigation mesh ( NavMesh ) from the scene geometry and settings such as the character’s dimensions. Its neighboring walkable polygons form the graph we’ve been discussing.
Once the project supplies a destination using NavMeshAgent.SetDestination , Unity uses A* to search between the polygons containing the start and goal. The result is a connected sequence of polygons, a corridor the character can move through.
For more detail, see Unity’s navigation system.
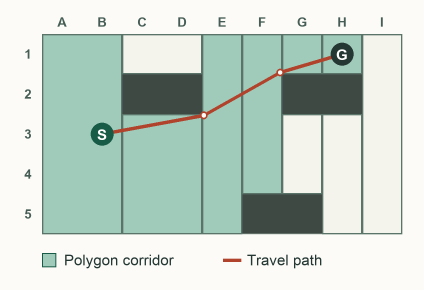
This figure keeps the furniture layout from the earlier examples but moves the seat to H1 to make the turns easier to see. The shaded polygons form one possible corridor; the line shows a route the character could follow through it.
Of course, this is a sketch of the floor plan. The polygon boundaries on an actual baked mesh will differ.
The character doesn’t need to walk to the center of every polygon.
Along a clear stretch of the corridor, they can head straight toward the next visible corner.
If another customer approaches head-on as they walk, local avoidance can adjust their direction for a moment. Once they’ve passed each other, they can keep following their original corridors toward the tables.
# Two pathfinding problems in the tavern
# Finding a place at the menu board
When it’s a party’s turn to order, the game lays out a shallow arc in front of the menu board and finds a place for each member.
There’s an easy check to miss: NavMesh.SamplePosition finds a point on the mesh near the intended position, but it can’t tell us whether this particular customer can get there from the queue.
Even two nearby patches of floor might be separated by furniture or a gap in the mesh.
That’s why the game also calculates a path from the customer’s actual position.
CalculatePath can return true even when the path only gets partway there, so it also needs to check for PathComplete .
Finally, it checks the distance from the positions already chosen, so two customers won’t squeeze into the same spot.
This excerpt from ServiceOrderQueue.TryBeginGroup checks the position for one party member. desired is the position calculated for them, and positions holds the places already assigned.
if (!NavMesh.SamplePosition(desired, out var hit, .65f, NavMesh.AllAreas)) return; | |
var path = new NavMeshPath(); | |
if (!NavMesh.CalculatePath(members[i].transform.position, hit.position, | |
NavMesh.AllAreas, path) | |
|| path.status != NavMeshPathStatus.PathComplete | |
|| positions.Exists(p => Vector3.Distance(p, hit.position) < .7f)) return; | |
positions.Add(hit.position); |
# Movement and arrival checks
Suppose a customer is walking beside a table. The navigation agent has calculated the next position, but the character’s collider catches on a corner, allowing only part of that step to happen. The next move then needs to start from the position the character actually reached.
Moving the character also involves a collision check.
NpcNavigator reads the position the navigation agent wants to reach next, asks the CharacterController to take that step, then writes back the position the character actually reached:
var step = agent.nextPosition - transform.position; | |
step.y = -2f * Time.deltaTime; | |
body.Move(step); | |
agent.nextPosition = transform.position; |
As a customer approaches the table, the game first checks the horizontal distance to the standing position beside their chair. If they’re already within reach, they stop there. Otherwise the game asks the navigation agent to move toward that position and uses HasArrived to check whether the move is complete.
This check waits for the path calculation to finish and requires a complete path. It then checks two distances: how far remains along the path, and how far the character’s actual position is from the navigation destination across the floor. Even if the agent reports very little distance left, this check won’t signal arrival while an obstacle is still holding the character back.
# Click-to-move in UE5
While implementing click-to-move in another UE5 project, I ran into this issue:
After passing the clicked position to Simple Move to Location , the character would always stop a little short of where I had clicked.
I mainly used Print String to investigate.
First, I obtained the target coordinates actually passed to the navigation node for that click. After the character stopped moving, I used GetActorLocation to obtain its actual coordinates.
Subtracting the two positions and passing the result to Vector Length XY gave me their horizontal distance. Printing that value with Print String returned roughly 50, so the gap was about 50 units.
(Here I was comparing the distance in the XY plane. The character’s Actor origin is usually in the middle of the capsule, while the clicked target lies on the ground. A three-dimensional distance would include that height difference, and I only needed the horizontal distance.)
A gap of about 50 made me think of the character’s capsule radius.
I then printed the scaled capsule radius returned by GetScaledCapsuleRadius , which also gave 50. The two values were almost equal.
I thought the problem lay in the navigation function I was using, Simple Move to Location .
Its arrival check included the character’s capsule radius in the arrival range, which explained why the character’s center stopped before reaching the clicked position.
I wanted it to get closer, but Simple Move to Location only exposes Controller and Goal inputs, with no direct way to adjust those arrival parameters.
I switched to AI MoveTo and separated click input from movement.
Once a click supplied a target position, I passed it to the character’s AIController to carry out the move.
(Previously, both steps were handled in the PlayerController .)
Using AI MoveTo let me adjust Acceptance Radius and Stop on Overlap directly.
The former sets how close the character needs to get before stopping. Enabling the latter also adds the character’s radius to the arrival range.
I therefore set a small, nonnegative Acceptance Radius and disabled Stop on Overlap .
The character could then stop closer to the clicked position, which resolved the issue.